Connect your Lemonado workspace to Claude
Connect Lemonado to Claude via MCP and give your AI co-pilot secure, real-time access to your marketing and revenue data.


Claude supports Model Context Protocol (MCP), which allows you to securely connect external tools and data sources directly into your chat.
With Lemonado’s MCP server, you can give Claude secure, real-time, read-only access to your business data — including ad platforms like Google Ads, Meta Ads, LinkedIn Ads, and TikTok Ads, along with Stripe, Snowflake, spreadsheets, databases, and other data sources connected inside your Lemonado workspace.
Unlike many MCP servers that allow models to modify data, Lemonado operates strictly as a read-only data layer. Claude can analyze your data, but it cannot change or delete it. Your underlying systems remain protected at all times.
This guide walks you through:
Opening connector settings in Claude
Adding Lemonado as an MCP connector
Activating it inside a chat or Project
Querying your data safely
Before you begin, make sure you:
Have an active Lemonado account. Sign up here for a 10-day free trial
Have at least one data source connected inside Lemonado
Need help setting up your account? Go to our Lemonado Starter Guide
Step 1: Open Connector Settings
Go to claude.ai in your browser.
Click your profile icon → Settings
Navigate to the Connectors section in the sidebar
Click Add custom connector
Note: You can create multiple Lemonado connectors if you manage separate clients, teams, or use cases.

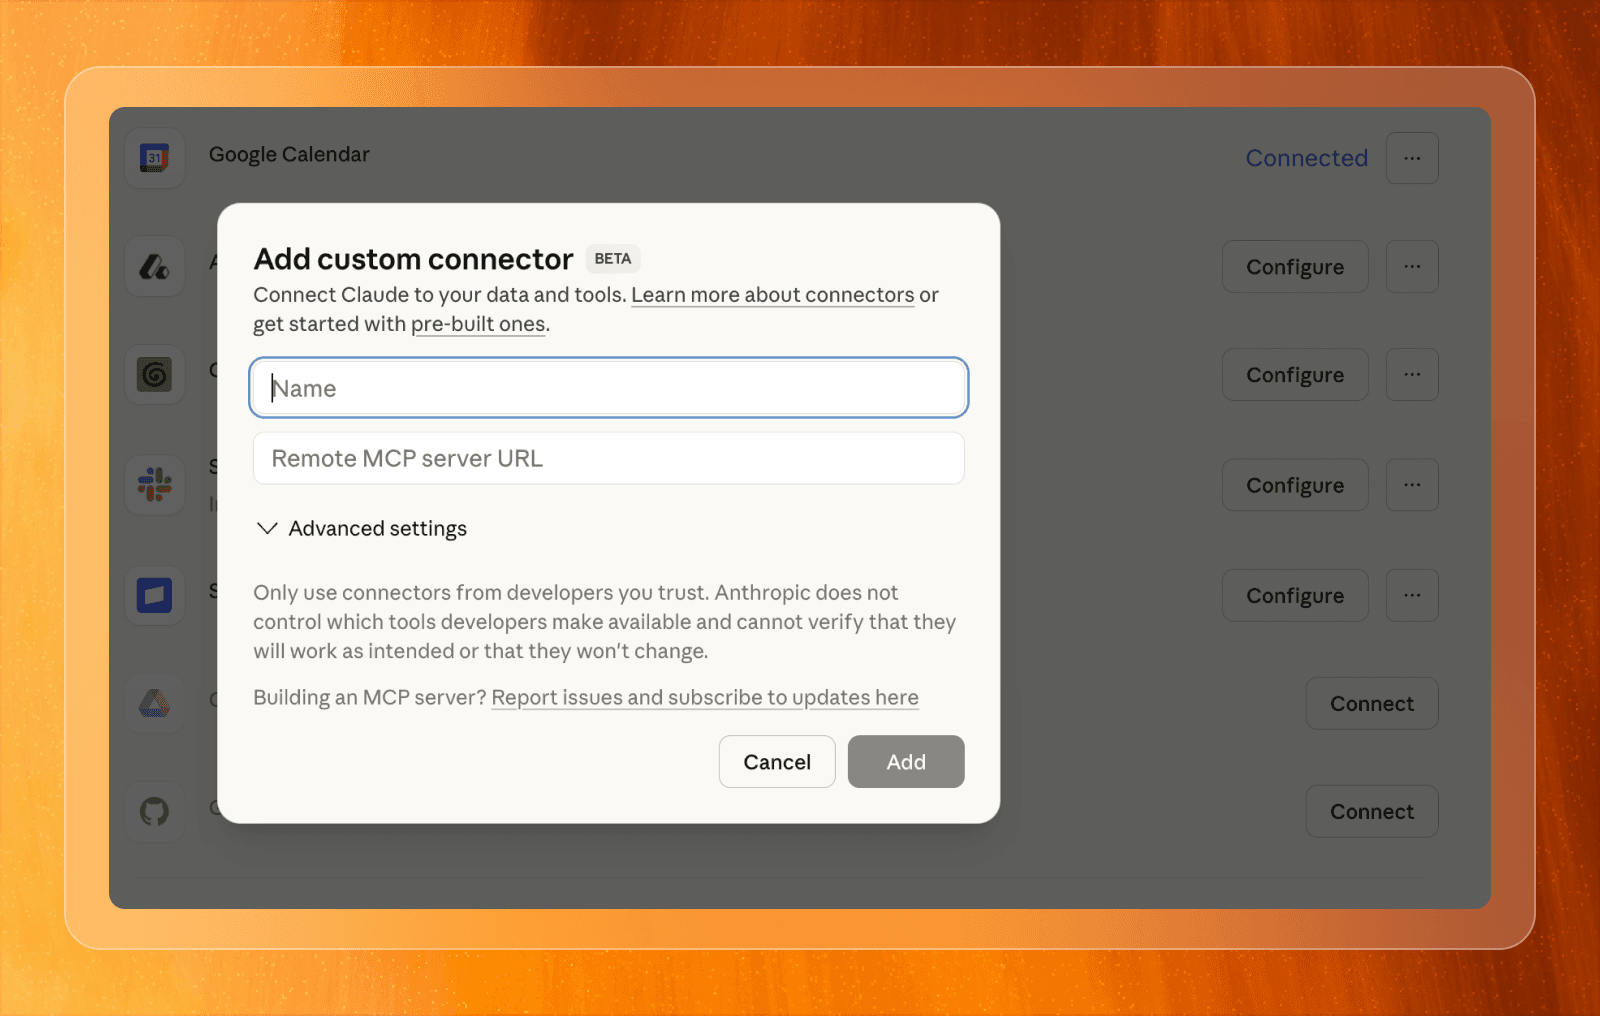
Step 2: Add Your Lemonado Connector
In the Add custom connector window, enter the following:
Name: Lemonado
MCP Server URL:
https://mcp.lemonado.io/mcpAuthentication: OAuth (recommened)
Click Add to save
Click Connect to begin authentication
A new browser window will open, prompting you to log into Lemonado and authorize Claude. Once authentication completes, your Lemonado connector will show as Connected inside Claude.
Note: Claude may display a warning that custom connectors are built by external developers. Lemonado is fully read-only — it can query and analyze data, but cannot modify or delete it.
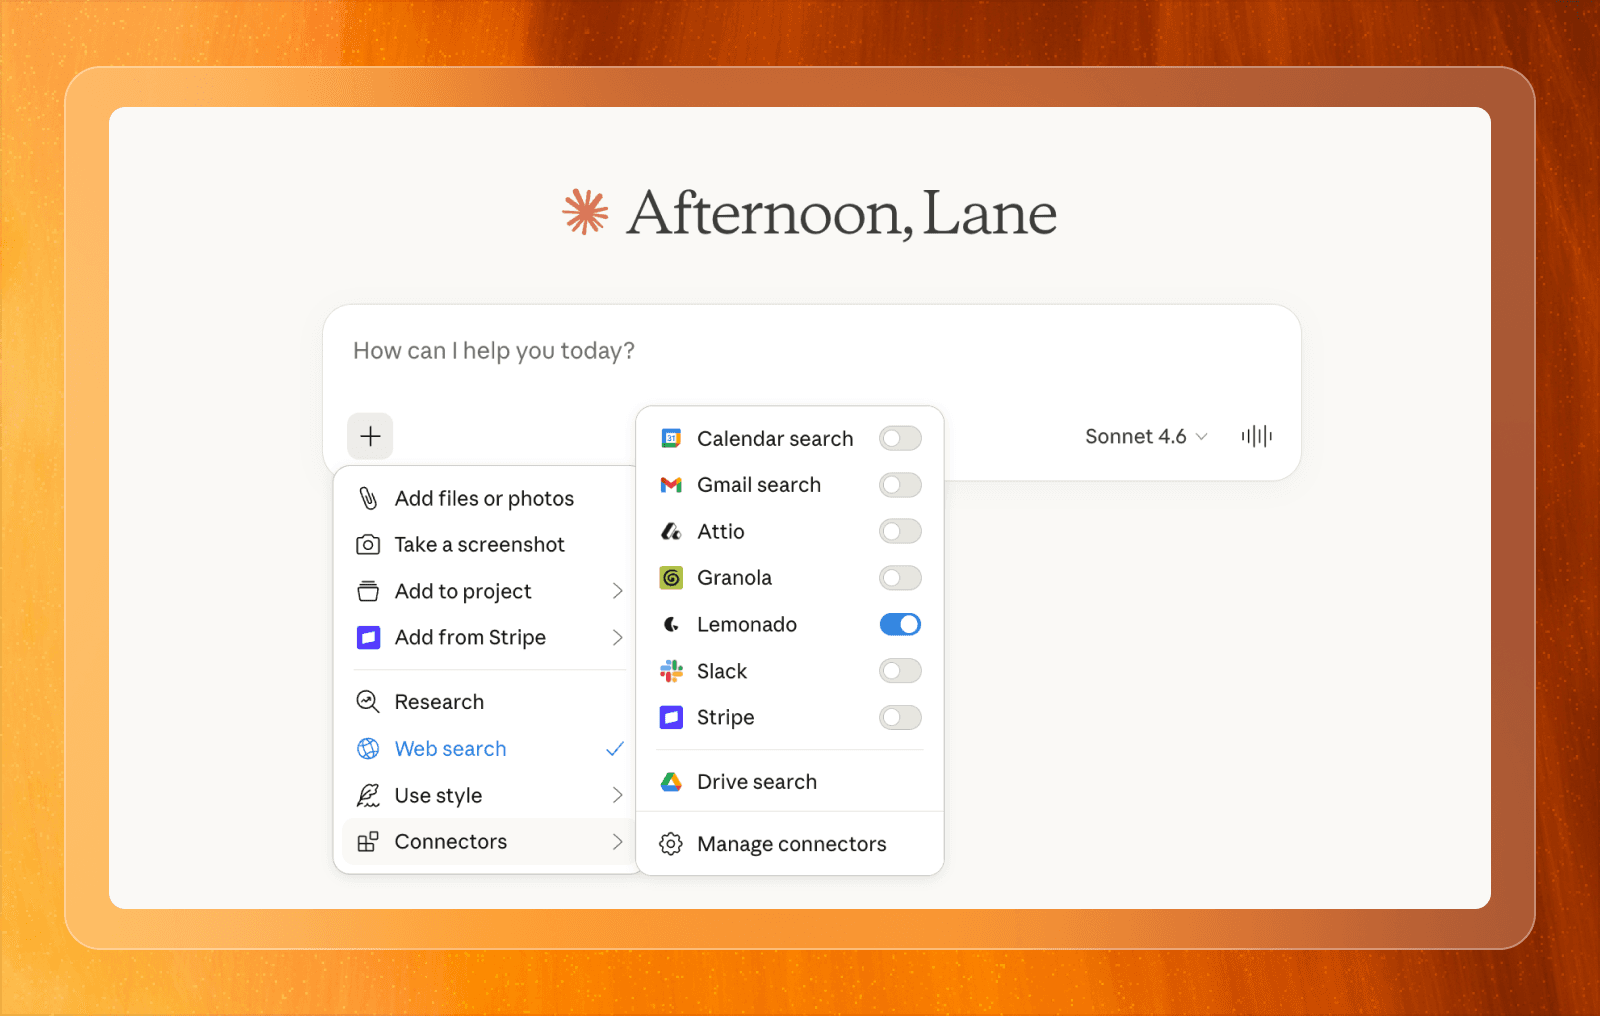
Step 3: Use Lemonado Inside a Chat
Start a new chat in Claude
Click the + icon in the chat to open browse files, connectors, and more
Find Lemonado from the list of available connectors
Toggle it on.
Once activated, Claude can route relevant queries to Lemonado automatically.
Using Lemonado Inside Claude Projects
If you use Claude Projects to organize work by client or team, Lemonado works seamlessly within those environments.
When Lemonado is enabled inside a Project, it remains available across chats in that Project, and Claude can combine:
Project-level context (strategy docs, brand guidelines, notes)
Ongoing conversation history
Real-time marketing and revenue data from Lemonado
You can update or refine context directly inside the Claude Project at any time. You can also manage client-level context inside Lemonado under Clients. Any context defined in Lemonado is carried with the data through the connector, ensuring Claude understands the structure and meaning of each client’s data.
For agencies, this effectively creates a persistent AI analyst per client — combining structured data, historical context, and strategic documentation in one place.

Step 4: Start Querying Your Data
Once Lemonado is active, you can ask natural language questions like:
“Which campaigns across Google, Meta, and LinkedIn drove the highest ROAS this week?”
“Compare cost per purchase by channel over the last 30 days.”
“Which campaigns have spent over $5,000 with no conversions this month?”
“Break down revenue by campaign and ad set for Client A.”
Claude will securely query Lemonado’s unified SQL engine, allowing you to combine and analyze data from multiple platforms in a single request.
All queries run in real time and remain read-only.
Managing or Removing the Connector
To manage your Lemonado connector:
Go to Settings → Connectors
Select Lemonado
Disconnect or remove the connector
You can also revoke OAuth access directly from your Lemonado workspace.
Best Practices
Scope access appropriately – Only connect the data sources your team needs.
Monitor usage regularly – Review Lemonado logs to track how queries are being executed.
Maintain security hygiene – Rotate OAuth tokens periodically and remove unused connectors.
You’ve now connected Claude to Lemonado via MCP, enabling secure, real-time access to your business data.
If you need help, reach out to hello@lemonado.io
Share this post
More tutorials


Stop fighting with data. Start feeding your AI.
Connect your data to AI and free your team from reporting and busywork.
